Saturday, December 25, 2021

Texas War of Independence: project update

 The TWI project has been chugging along the last couple of months with some new added units...
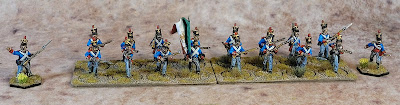
Mexican Permanente infantry.
Artizan Designs.

Mexican Presidial troopers.
Boothill Miniatures.
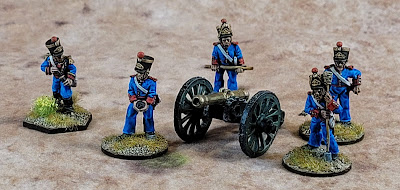
Mexican artillery.
Boothill Miniatures.

Texian artillery.
Boothill Miniatures.

Mexican civilians.
Boothill Miniatures. 

Texian Deployment Point.
Boothill Miniatures.


Mexican Deployment Point.
Boothill Miniatures.

Mexican cavalry Deployment Point.
Boothill Miniatures.


Mexican cazadores Deployment Point.
Boothill Miniatures. 

Texian Deployment Point.
Boothill Miniatures.

The first of many buildings, Sarissa Mexican church.


3d printed cacti.

The full Mexican force to date.


Monday, November 1, 2021

TWI: Mexican Permanente cavalry (dismounted)

I'm continuing to plug away at the TWI project with a small addition of one group, a Big Man, and a Deployment Point (using the spare figures)...

Mexican Permanente cavalry.
Boot Hill Miniatures.

Next up, more Mexican regular infantry, this using Artizan Design figures...


Monday, October 18, 2021

Texas War of Independence: a new project

The blog would indicate I've been dong very little hobbying since March of this year but it hasn't felt that way. True, my painting output is down this year but I do have something to show for the last few months. I have started on a new project, inspired by Boot Hill Miniatures Texas War of Independence figure range. And the painting of these lovely figures has been considerably slowed by the decision to build this monstrosity from Sarissa Precision...

Still much to do on the Mission.... sanding the plaster, base-coating, dry-brushing, ground texture, etc.

Although the Mission has taken up much of my time, I was able to get on a bit of a painting roll and get the first 100 figures of the collection finished.


Mexican Permanente infantry, two groups and two Big men for Sharp Practice.
Boot Hill Miniatures.


Mexican Activo infantry.
Boot Hill Miniatures.


Mexican Zapadores (sappers).
Boot Hill Miniatures.


Mexican light infantry with Baker rifles.
Boot Hill Miniatures.


New Orleans Greys... cuz, well... they're from NO and wear grey uniforms.
Artizan Designs.


Alabama Red Rovers.
Boot Hill Miniatures.

Texian skirmishers.
Artizan Designs.


Wednesday, May 5, 2021

FIW: colonial militia

My last order from Galloping Major included some non-uniformed colonial militia, and lovely figures they are (as are all the GM figures).

One group loosely modeled on Pennsylvania Provincials (or Delaware - part of the the Province of Pennsylvania).


Two groups of generic militia/non-uniformed provincials.

A couple of figures were left over so went into a Deployment Point for the Provincials.

And a group shot of the British FIW force, not including any natives.


Tuesday, April 20, 2021

FIW: British grenadiers

I had a hankering to add some grenadiers to my British FIW force and wandered around the interwebs in search of suitable figures. My two favourite figure ranges for this project are North Star and Galloping Major. Unfortunately, neither include British grenadiers. The only other manufacturer that I like and somewhat closely matches my current collection in size and sculpting style is Front Rank but no raised detail on the mitres. This would be my fall back position if I found nothing else. Continued searching and found a vague reference on a forum or blog (can't remember where) to the Wargames Foundry SYW British range. My first thought was that Foundry figures would be too small (as is the case with most of their ranges compared to more recent sculpts... despite the fact a lot of their figures are quite lovely). But the online reference also mentioned the bulkier size figures. So an order went off to Foundry!

45th Foot grenadiers on the left (green facings); 40th Foot grenadiers on the right (buff facings). Both of these elite companies were part of the Louisburg Grenadiers, a composite battalion formed for the Quebec campaign in 1759 (along with the grenadier company of the 22nd Foot).

The Wargames Foundry figures were easy to paint and suit my painting style perfectly. Lots of raised detail guides the brush, making the large amount of lace and equipment a breeze (relatively speaking), and allowing washes to flow well.


Monday, March 22, 2021

Dark Ages church - pimping the basic model

As a break from painting Dark Ages Saxons for the new project, I decided I'd get stuck into the Sarissa Dark Ages church I recently purchased from Arcane Scenery & Models. My first thought was to do a little research as the model has no stonework etched into the mdf walls. My (admittedly) uneducated impression of thousand year old churches is that they should be open stonework as we see all over the British Isles. But apparently, it was not unusual (but by no means ubiquitous) practice to coat or plaster stone walls with lime mortar that would take the colour of the earth with which it was mixed (vibrant reddish to yellow to white colours). This would provide an extra level of insulation, protection for the stone against the elements, and repelled vermin. I've also seen a reference to lime plastering helping in fire prevention. So, having availed myself of the interweb knowledge-base (everything on the web must be true!), I was content not having my church with open stonework and instead plastered. 


The basic Sarissa church assembled. This was a relatively easy build. I did, however, spend some time sanding down all the right angles: base, walls, window frames, etc. This "softening" of the basic model is all-important to give it a more organic feel. Few buildings, even modern ones, have perfect right angles and sharp edges. Also at this point, I covered the entire model in a couple coats of diluted PVA to seal and protect.


The next step was plastering. I went to my old fall back, Liquitex ceramic stucco, and mixed it with some basic chocolate brown paint.


The brown stucco was applied to the walls with an old brush, making sure to stipple rather than smear or brush. I was also not too concerned at this point to avoid getting the stucco on the window frames. This can be easily scraped off after drying.

A wash of diluted GW Agrax Earthshade applied.

Several drybrush layers, starting with the original chocolate brown and successively mixed with a light buff.


The stone window frames etc have been scraped of excess stucco and painted black.


Successive drybrush layers on the stonework, topped with Vallejo Heavy Warmgrey, which gives a very slight salmon-pinkish feel.

And the shingling begins using Warbases shingle sheets.

The three roofs complete with their shingles. The peak tiles are cut from the already creased edge of a brown paper envelope. Next up, coating the roofs in diluted PVA to seal and protect. 


While the roofs were drying, I added some water and mold stains on the walls, particularly around the windows and eaves. I used heavily-diluted GW contrast paints followed by a light drybrush of the GW Heavy Warmgrey again to blend better with the surrounding un-stained stucco. I also added some moss around the base, the windows and the eaves.

The shingled roofs have been primed black with successive layers of brybrushing (black + off-white).


Individual roof tiles have been treated with various light washes (browns, greens, blues, and yellows). This step, I think, really makes a difference as it takes a fairly monochrome surface and adds depth and variance. The roof, after all, is one of the first things the eye catches on the table (since we're usually looking down from above). I've also added some flower and grass tufts to the base to add some colour and break up the straight lines a bit (again, helping to make the model feel a little more organic).

The finished model with its inhabitants.